April 2nd 2014
March 26th 2014
March 20th 2014
March 10th 2014
Feb 15th 2014
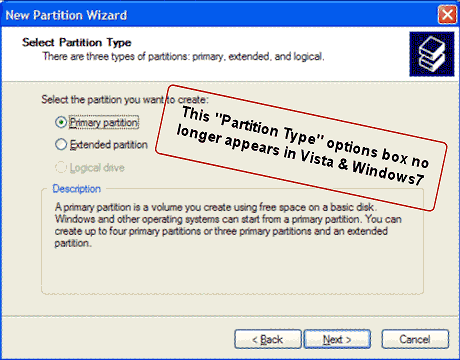
Creating and Deleting Partitions
With Microsoft's Disk Management Tool.
Rather than let the install of an operating system automatically create partitions for
you it can be safer and give greater flexibility if you plan and create your own partitions.
Create over Convert.
Moving or modifying existing partitions is not something we readily sanction because there is a much higher degree of risk involved over simply backing up data and then copying it back across to newly created partitions. The Disk Management tool does not have the many options you will find in other partitioning software for modifying existing partitions, but this is no great loss or inconvenience in our opinion. The article on this page only covers creating and deleting partitions, if you do need to alter an existing partition then see the next article in this series and please also refer to this other article...![]() Partitioning Best Practices.
Partitioning Best Practices.
 Out of Line.
Different versions of the Disk Management tool will make differently aligned partitions that are suitable for one or the other format of hard drive. The tool in Vista and later Windows versions will make partitions suitable for the new Advanced Format drives, while in XP based operating systems and earlier it will make partitions suitable for classic format drives. Creating the wrong partitions on the new drives can cause a major performance loss, but worse still is using the opposite style of tool to the existing partitions on a hard drive, as this can result in the loss of existing partitions. ![]() Working With the New Partition Alignments
Working With the New Partition Alignments
What's your Style?
The new GPT partitioning style that is set to take over from the classic MBR (or msdos) way of partitioning a hard drive has a different set of rules and conventions that are not covered in this article.
If you haven't read it already you should click back to the first article in this series for an introduction to the Disk Management tool and the various things you should know before you begin.
Delete a Partition
Fig: 1
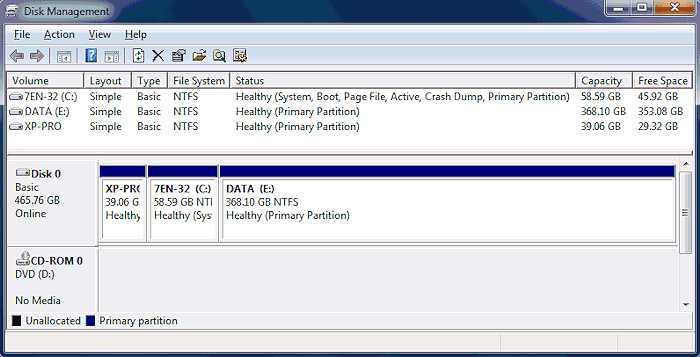
Fig: 2
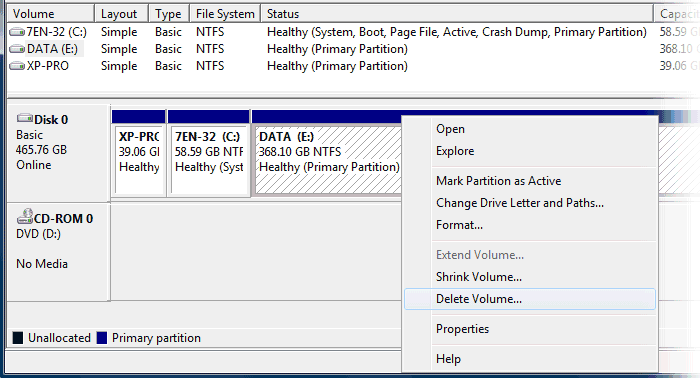
Once you are sure the correct area is selected you can if you prefer use the options from the menu bar at the top of the Disk Management window, but we would recommend that to avoid any focus errors you always right click on the area you want to modify and use the pop-up menu that appears (fig:2). To remove the entire partition simply select the option Delete Volume, (or in XP Delete Partition or Logical Drive), and then confirm on the next warning box that you do indeed want to delete it.
Drive in Use?
If the partition has a drive letter attached to it you may get a notice that something on the drive is in use and it might require a reboot to complete the job of deleting the partition. This is often caused just by a Windows process such as system restore or the recycle bin and is seldom anything critical that Windows won't adapt to. You could try removing the drive letter first which would dismount the partition and so let you delete it, but it could just give you the same message about requiring a reboot to complete the task of removing the drive letter.
You do need to be cautious about deleting a partition that is in use as perhaps you have installed some software to the partition, or something has placed storage or backup files there, or you moved a Windows folder there. If in doubt you should just remove the drive letter and run the machine for a while to see if the missing drive is going to reveal any problems. If however your intentions are to restore the partition with the same drive letter and contents after the partitioning work, as we do below, any links and dependencies should also be restored regardless of where that partition has moved to.
![]() Windows 2000
Windows 2000
If you have a Win2000 based operating system make sure that it does not have its only paging file on a partition you are intending to delete or modify, because Win2K will hang on bootup when it can't find a paging file. You should move the existing paging file or create another from the options inside 2k before you proceed. If you intend to later recreate a paging file partition complete with original contents and drive letter, you will also have to ensure the Volume Label of the partition is the same. During bootup Win2K uses volume labels to find partitions, which is why you should never change them other than from Windows options inside 2K.
Creating Partitions
Fig: 3
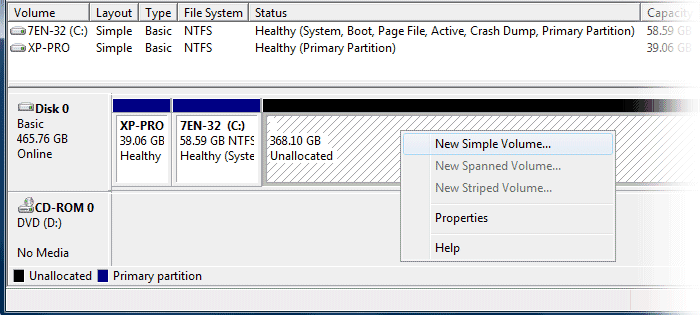
Once we have unallocated or free space on a drive then we can go ahead and create new partitions (fig:3). Now would also be the time to resize the second partition on the drive if we wanted to make it larger or smaller. To make a new partition right click on the area you want to use and from the menu choose New Simple Volume, (in XP it will be New Partition or New Logical Drive). Note that the list of options you will see on your pop-up menu will vary depending on which version of Windows you are using, you may have less or more options than in our example here. Options for spanned, striped, mirrored and raid are for Dynamic Disks only and are outside the scope of this guide and not recommended for use with any form of multibooting. ![]() Don't be Dynamic
Don't be Dynamic

Now Calls a Partition
a 'Simple Volume'.
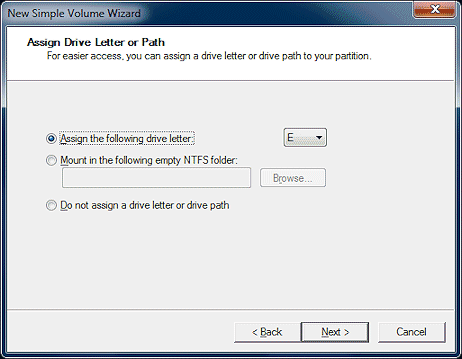
This option box (fig:7) gives us the choice of how or if we want the partition to be seen by Windows. Assigning a drive letter means it will appear as a drive next to our other drives and devices and we will have access to it from Windows. If the partition is for another operating system that we don't want Windows to see then we can select not to assign a drive letter. We can add, remove and change drive letters at any time so it is not really important what we do now, except if we are going to be installing another copy of Windows to this partition from within the Windows we are currently booted into. In this scenario the new Windows will by default be assigned the next available free drive letter, which will be and have to remain the letter that the new Windows install will always see itself as. If we want to make our own choice for this letter then we must manually do it before we begin an install. If we want all our Windows installs to see themselves as the C: drive then we have to install from outside of Windows.
Mount in a Folder
The other option in fig:7 of mounting the partition in a folder will essentially give us a data partition that is not assigned a drive letter but instead the name of the folder that was selected. The partition will still appear with the familiar drive icon, but it does not have to reside next to the other drives and devices and can be placed elsewhere. Mounted folders are a little different to just a shortcut and may be a useful way of providing easy access to additional storage space on busy corporate machines that can't be shut down and reconfigured. For a multiboot PC or where operating systems are cloned and moved around then we advocate keeping things as simple as possible and so would advise against anything that can complicate or confuse matters. If you want to know more about mounted folders then here are some Microsoft Links.![]() Create NTFS mounted drives.
Create NTFS mounted drives. ![]() Using NTFS mounted drives.
Using NTFS mounted drives.
![]() Mount or dismount a drive.
Mount or dismount a drive.
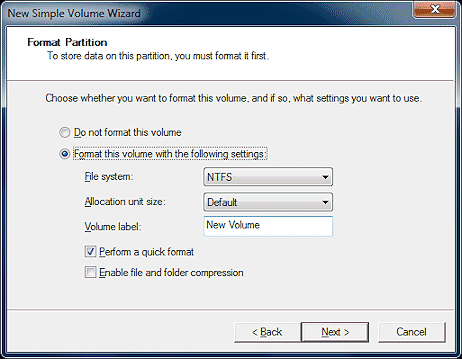
Formatting.
Whether we format at this point (fig:8) may depend on what the partition is for. If it is for the install of a Windows operating system then we can either choose to do it now or do it from options during the setup and install of our new OS. There could be issues if the version of Disk Management we are using formats in a different version of NTFS to the one our new OS prefers, but all Windows versions since XP to Win8 will use and format in NTFS v3.1 so we should have nothing to worry about here for the time being. More relevant for us multibooters is the PBR version that will be written to the drive during the process of formatting. In certain circumstances when employing separate system and boot partitions we could end up with the PBR (partition boot record) not matching the operating system we have installed to a partition, which may cause us a problem later. So our advice would be that if you are not formatting from a Disk Management tool inside the same version of Windows that you are going to be installing to a new partition, then either leave that partition unformatted so that Windows is forced to do it during install, or use the options during Windows install setup to reformat the partition.
File System.
If the partition is for a Windows OS or just data then thankfully we won't be confused by choice on which file system to go with. In XP and Vista’s Disk Management tool if the partition is over 32gigs then there is no choice - it’s NTFS. In Win-7 and later there will be an extra option for the new exFAT, but this is only for data partitions and still primarily for flash media and has a few limitations, so for mechanical hard drives stick with NTFS, for Solid State Drives the first choice would be NTFS, but if circumstances and limitations did not rule it out for you then exFat could be considered. If a partition is under 32gigs then there will be the option of FAT32, and if it is under 4gigs an option for FAT. Unless you are installing an old Win9X or want to share a data partition with an OS that does not have NTFS support, or you want a small FAT partition for a specific reason, then you should still be going with NTFS. If the partition is for the install of a non-Windows operating system that requires a different file system then it is immaterial if the partition is formatted now or not as it will require formatting later, ideally by the install setup of the operating system being installed.
The next option of Allocation Unit Size is for IT-pros and super-geeks so leave on default. The Volume Label is basically the name of the partition that also shows as the drive name in My Computer and Windows Explorer and it can be a really useful way to remind ourselves what is on each partition. On a multi-partition machine several partitions tagged as New Volume or Local Disk will give no clue to its content, so we recommend you give each partition as descriptive a title as you can. The character limit in Disk Management and Windows is 32, but some other partitioning tools and OSes will display less than half that, so keep it short. You can change volume labels at any time.
The Quick Format option will be selected by default in 7 & 8’s version of Disk Management, but we will have to check the box ourselves in all previous versions of the tool. The only difference between a standard and quick format is that the standard format will additionally scan the entire partition for bad sectors, which on today’s large drives could take many hours. If you suspect a problem with a hard drive you can run the bad sector test separately and at a more convenient time. ![]() How to run a bad sector test on a hard drive.
How to run a bad sector test on a hard drive. ![]() http://support.microsoft.com/kb/302686
http://support.microsoft.com/kb/302686
Enable File and Folder Compression. Selecting this option will mean that all data on the partition will be automatically compressed to save space. Not a good idea for an operating system partition and almost quite redundant on today's large drives and when most space hogging media files are already natively compressed.
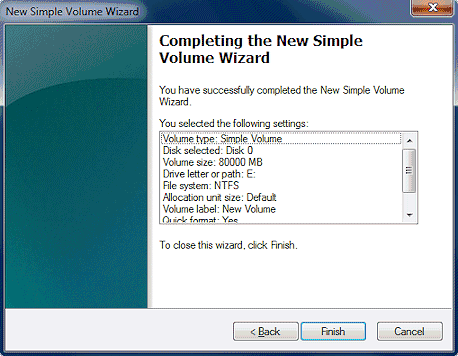
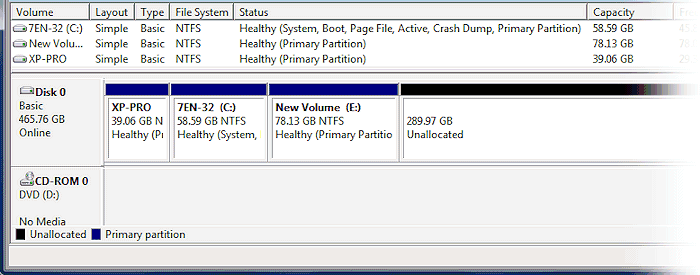
As you can see in fig:10 we now have our new 80gig (approx) healthy primary partition with a drive letter of E: and the title of New Volume, which will in Windows Vista and later be automatically registered and opened (mounted) and so it should presently appear in My Computer and we will likely get a popup box telling us it has been discovered.
It has to be Logical.
With our first new partition created we can continue to partition up the rest of the unallocated space. With 3 primary partitions on the drive the Disk Management tool from Vista onwards will on hard drives that are using the classic MBR style of partitioning automatically create a forth partition as a Logical. An Extended partition will also of course be created to house the Logical and will use all of the unallocated space regardless of how large the Logical is. There seems to be no way round this behavior so if we did want to have a 4th primary partition we would have to use another partitioning tool. Likewise if we wanted just one or two primaries and an Extended then we would need another partitioning tool, or we could plan things out to create the primaries first and then delete some and expand others after the Extended had been made. There should be little need for such workarounds however as the layout of three primaries and then an extended is the optimal configuration for us and most situations.
It has to be Primary.
On drives using the new GPT style of partitioning all of the partitions will be primary and there is no technical limit to the amount we could have, but the Microsoft implementation of the new standards does restrict us to 128 partitions, which should be more than enough for anyone.
Fig: 11
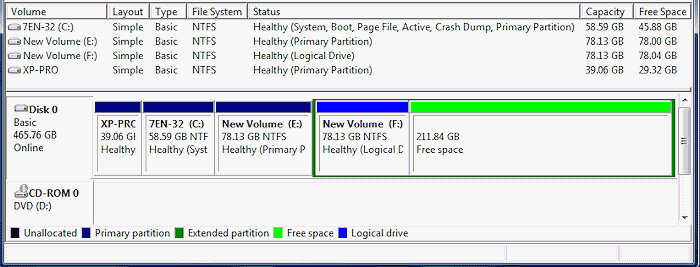
Fig: 12
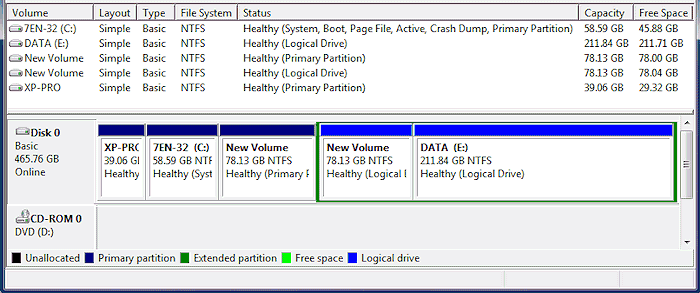
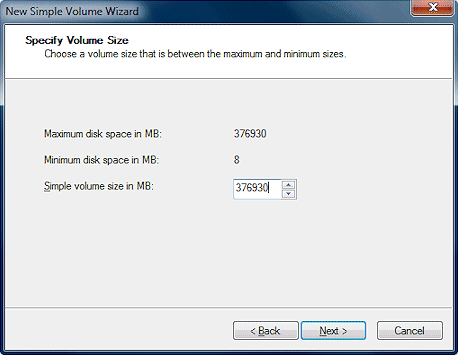
We only wanted to make one more partition on the drive so when we came to the size option shown in fig:6 we did not change it and left it set to use all of the available space. We did however alter the Volume Label option shown in fig:8 by changing it from New Volume to Data. After the partition was created we removed the drive letters from both of the previous partitions we had made and changed our re-created Data partition back to E: to match what it was before we started. The final result is that we have only the original two drives showing in Windows with the same drive letters. After we restore the data to our E: partition we won't be able to tell the difference in Windows except for the fact that our Data partition is a little smaller.
If you are planning duplicate clones of an OS then it is best not to create the individual partitions yourself, but to let the cloning process do it so that all clones have the exact same size of partition, so that future re-cloning operations are smoother and quicker by not having to resize in the process.
For just starting out and getting to know Linux a partition of 10 to 20gigs would be sufficient for the operating system, with a separate swap partition of 2 to 4 gigs. The optimum setup for serious and experienced Linux users is to split the operating system and its files across 3 or 4 separate partitions, but for starting out and casual users a single operating system partition will suffice.


All product and company logos, icons and images that are reproduced on this site are the property and trademarks of their respective owners and are used here merely to illustrate their products, NOT to indicate or infer any endorsement or partnership unless otherwise stated. We have endeavored not to reproduce copyrighted images or graphics or infringe upon the rights of any trademark or copyright holder. If you believe or suspect we may have breached the permissible use of copyrighted material then please bring it to our attention. The reproducing or copying of original material from this site is currently allowed for non commercial purposes with the provision that your source is clearly indicated and that a back-link to the referenced information is included. Thank You. See our full Terms of Use. Material on this site is not guaranteed to be free of errors. Multibooters.com 2012 - 2013